I wanted to get a play kitchen for my girls (almost 5 and 18 months) for Christmas but nothing I saw felt right. I wanted something that could be enjoyed by both of them for years to come but all the plastic kitchens were too small and seemed like they wouldn't stand up to much play abuse. I started looking up patterns for making your own play kitchen and came across the idea to refurbish an old entertainment unit. My favorite was at www.suttongrace.blogspot.com. So I started trolling good will and craigslist for the perfect entertainment unit and after a month of searching found this one for $40. It is really solid and the perfect size. There were doors on the front bottom but I in my excitement started taking it apart before I got the "before" picture. I started by ripping off the thin backing on the unit and replacing it with ply wood. 
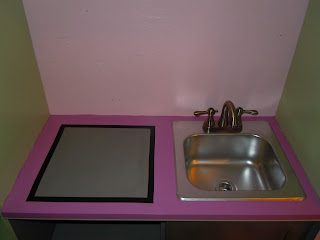
Then I cut the hole for the sink (which I purchased for $12-including faucet- at Habitat for Humanity) and started priming. After priming I painted every thing.
I reused the bottom doors but took off the magnetic latches and put them on the top so that the doors would open from the top like a dishwasher and oven. Then I cut out an opening on the oven front and spray painted both the "dishwasher" door and the "oven" door a metallic silver. After they dried I put on some old oven knobs using bolts and nuts so that they would turn then added a small towel bar (also purchased at HFH-I just spray painted the sink and the hardware to freshen them up). I bought a sheet of plexi glass at Lowe's and used a clear caulking to glue it in place on the oven door.
To out line the stove I painted a gray square then used electric tape to edge it in.
For the burners I bought a couple of plastic lids in the paint section at Lowe's and spray painted them black.
I really wanted something authentic for the elements and was thrilled to find a tangle of electrical chording at HFH. I coiled the chording and glued it to inside the lids with liquid nail.
Then glued the burners in place. I really love how they turned out.
The fridge gave me issues. I couldn't figure out how to reuse the door that came on the original unit. It had glass on 3/4 of it and ran the full length, and I really didn't want a fridge that big. I wanted to leave some space for food storage. So I found this cupboard door at HFH and it was just about a perfect fit. I bought some new hardware and spray painted it metallic silver too. *I primed the door then put 3 coats of this special, and expensive, magnetic paint on the door. Then I spray painted over it with the silver but it didn't cover very well so I went over it with some gray paint I had on hand. I don't know if that was too much paint but the door is so weakly magnetic that it won't hold a magnet. It was also really cold in the garage even with the heater running so that may have effected it but annoyed it didn't work out.
The unit was really tall so I put in a shelf (under the curtain) and attached a kid's microwave to it. I also thought that it would be fun to put in a window over the kitchen sink and loved this frame with plexiglass in it I found for $2.00 at HFH. The side of the unit had a DVD storage area covered by a door. I took the door off and painted the shelves and call this area the pantry.
I didn't have time to finish a few things but since then have added under counter lighting, sewed the curtains, and found a cute metal door hanger in my Spring decorations in my garage and turned the picture frame into a shadow box.


9 comments:
I am SOOOO impressed!
Shirley
Brilliant! I had seen someone make the stove elements out of CD's, but then they would just get all scratched up. This was a far better idea. :)
It's incredible! You are so talented!
That is so cool! It's SO much better than those little plastic ones!
Adorable Shama! I bet the girls love it.
I LOVE it Shama! That is so awesome! I bet the girls have a blast with that!
Way to go, Shama. Such a cool mom!
It's beautiful! And worth so much more than the cost of the supplies. I hope the kids love it.
This is AWESOME........I love it!
I'm jealous, but looking at it makes me tired, I can only image all the paint time. Good for you though.......you've created a beautiful heirloom for you family. Miss you guys!
Post a Comment